Home
About us
Journal
FAQ
Home Improvements
Lifestyle
Ham Radio
Route Maps
Links


Exterior Improvements

We divided the "improvements" into two categories, Exterior and Interior. This page has the exterior items. Go here if you want the page with interior items.

added E17. Fridge Boiler Control by ARPRV 25 May 2017

added E13. Water Softener for incoming water 28 Apr 2018

UPDATES 28 Apr 2018


Here's the list of exterior home improvements on our rolling home:

E1. Fan-Mate® cover

E2. Quick-Bite® 7700 Coupler

E3. Intellipower® 9260 smart converter/charger

E4. DOT reflective tape at rear of camper

E5. Cast aluminum locking wheel chocks

E6. Zip-Dee® roadside and rear awnings

E7. Aluminum 30# propane cylinders

E8. Sharp® solar panels and BZP® mppt solar charge controller

E9. Two or Four 6-volt Golf cart batteries

E10. Flagpole bracket and poles storage tube

E11. Equalizer® weight distributing hitch

E12. Sediment Filter for incoming water

E13. Water Softener for incoming water

E14. Jack TV Antenna

E15. Portable Generator

E16. Chevrolet Silverado 2500HD

E17. Ham Radios and roof-top antennae

E18. Fridge Boiler Control by ARPRV

E19. Miscellaneous items


Back to Dreamstreamr Home Improvements Page

Go to Dreamstreamr Home Page

Go to Interior Improvements

Go to What About The Failures?

E-mail Us at as4822@gmail.com

© dreamstreamr.com 2007-2019


E1. Fan-Mate® Vent fan cover:


Fan-Mate 9000 The Fan/Mate by MaxxAir might be one of the best things we've aded to improve living conditions inside. This cover solves two problems -- keeps Jim from letting the rain in, and allows venting anytime, even in heavy dew or rain conditions. When it rains, our Fantastic fan ® can automatically sense the rain and close the cover, preventing rain from entering. Twice, at least, Jim has over-ridden the fan's automatic sensing/closing function. Guess what happens when it rains? One night we gratefully slept on the dry sofa because our bed was wet! The bed only needed a full day to dry after a pretty good drenching from that Florida down-pour.

Heavy dew activates the rain sensor, too. Some nights the fan cover would close, then open, then close, then open and on and on. It seems to wait until just after midnight, when we're sound asleep, to start this cycling. Too, we almost always want a roof vent open while parked. The catalytic heater requires venting, and we just like fresh air. How to keep the Fantastic Fan vents open without allowing rain to enter? We had seen these MaxxAir® Fan-Mate® covers on other trailers.

We selected the opaque black Fan/Mate, so we would also get room darkening in the bedroom. Installation was a cinch, the Fan-Mate® looks good, and we have only occasional cycling of the Fantastic Fan cover or with sunlight during naptime. This is a great solution for us, one of the best improvements we've made to the exterior of our RV. We purchased a second FanMate black cover for our Airstream a year later, this one for the front fan. Now we have both fantastic fans shrouded with MaxxAir FanMates.


E2. Quick-Bite® 7700 Coupler:


Quick-Bite Coupler Ball-gripping jaws This is an item we saw on a friend's Airstream and we thought it made good sense. Donnie, one of Deb's two very wise brothers, did his best to dissuade us from changing our trailer's coupling. He said it was just not worth the trouble, all a coupling does is hold onto a ball. He's probably correct, but we thought we should try it out. This new coupler, a Model 7700 Quickbite, is a great idea and works great.

Our lifestyle involves hitching and unhitching more frequently than anyone except a boat trailer owner. The Quickbite® coupler has made this easier. We have 113,000 miles on this coupler (May 14, 2008 to Mar 11, 2017) and we're loving it. When you back the tow vehicle to the hitch, the coupler automatically closes around the ball and latches.

The coupler surrounds the ball completely and grips the ball more securely than your trailer's stock coupler. Okay, what's the big deal about this? You can, usually in one motion and unassisted by a spotter, back into the QuickBite coupler. You don't have to be centered as accurately as with your stock coupler -- plus or minus almost two inches left and right seems close enough.

And don't even think about whether you are the right distance back to align the ball under the coupler -- just ease back really slowly until you hear the coupler close around the hitch ball and automatically latch with a loud "clunk". Done! It's really this easy.

UPDATE: We heard recently the new owner of the trademark has suspended production and distribution of this hitch coupler. They sold for $130-160 each, plus welding costs, and we think are a great product. Hopefully someone will bring this back [5 Jun 2016.]


Return to top


E3. Intellipower® 9260 smart converter/charger

[note: this isn't exterior in the pure sense, but fits with solar power and golf cart batteries] Our 2005 Airstream International CCD 25 trailer had another brand converter/charger. While the mfr insists this is a true multi-stage charger it didn't prove a very good battery-maintenance solution for us.

This seems to have lead in our case to boiled (and thence dead) batteries. Sure, you can add water every few days or week and prevent boiling out your batteries. Or you can manually (or automatically with a heavy-duty timer) switch your charger off for all but one or two hours a day.

We installed, in Summer 2009, an Intellipower 9260 converter-charger. Camping World was running an internet special and we ordered the converter to be shipped to the next RV park we planned to visit. Jim spent an afternoon removing the old converter/charger and installing this new and super-smart Intellipower by Progressive Dynamics. Jim followed great
instructions he found through the Best Converter website.

The new Intellipower unit is better than plug and play -- this is plug and forget. If you feel smarter than the computer then you can use the "charge wizard" and manually select the mode from normal to boost. Or you can leave it off most of the time, relying on solar power to maintain the batteries. It is nice, though, to be able to leave the Intellipower on and know we aren't boiling out our batteries. We check water level in the four golf-cart batteries at least monthly (using a battery watering system so we aren't exposed to battery acid.) Every month we might add a cupful or two of distilled water. This is a very intelligent converter charger, we think. Do you think it makes us look more intelligent?

One downside to this upgrade: the PDI 9260 has a 900 watt rating that requires we move the fridge to gas before starting our 1,000 generator. Not a big problem this, but a 9245 might have been an ample match for our needs and would have been a little easier on the infrequently used, but still important to us, generator.

We wrote about this install here on our blog


Return to top


E4. DOT reflective tape at rear of camper:


Reflective tape Don Brancato of Don Mar Airstream in Lynchburg, SC first turned us on to this reflective tape as an important safety measure. It is so effective USDOT requires all over-the-road trailers to be equipped with this in certain places. Why would we want any less visibility? Oh sure, our camper has reflectors. I'll take the extra margin of reflective visibility, thank you.

When we travel with friends they invariably catch sight of this reflector strip across the entire width of our bumper. And before long they have added the reflector strips onto their bumper too. Darn, makes it harder to spot our trailer in a shopping center parking lot. It works -- it makes their trailers much easier to spot at night -- these reflectors shine back brilliantly to the glow of headlights.


E5. Cast aluminum wheel chocks:


Wheel chocks Chocking the trailer's twin-axle wheels securely before unhitching not only keeps the trailer from rolling but also helps increase stability when parked. We found very nice cast aluminum alloy wheel chocks several years ago at Virginia Highland Haven Airstream Park from a fellow Airstreamer, Harold Hull. Jim clear-coated these with Rust-Oleum clear spray and adjusted them to the tightness needed for our wheels.

We adjust the tension now and then as needed. One friend suggested we should beware these, they might release if we're on a hill. But we've noticed (more than once, unfortunately) our otherwise very capable truck cannot pull the trailer unless we release these chocks first. They've worked well for us.


Return to top


E6. Zip-Dee® roadside and rear awnings:


Awnings This improvement is one of several of our very favorite ones to our Airstream. Airstream Factory includes a large curbside Zip-Dee awning for the patio area outside our door. We have a dark tinted awning over the large front window. The roadside and rear had no awnings, leaving the windows vulnerable to rain entry. Adding these two was the first upgrade to our Airstream trailer. Awnings over the windows allow us to use the windows even during most rainfalls. The rear awning blocks out bright moonlight or even brighter campground security lights. The road side awning helps shade that entire length of trailer against hot midday sun and improves our refrigerator's performance.


E7. Aluminum 30# propane cylinders:


Aluminum propane cylinders These are the same capacity as the original equipment steel ones but are a little bulkier. They have built-in gauges, are lighter weight, and are rust-proof. They are a little crowded in the cylinder enclosure provided on the CCD 25, but reduce the weight on the trailer hitch by 16 pounds and they are lighter to handle.

UPDATE 03 March 2012: The excellent Arizona Propane Co. in Phoenix and Mesa AZ replaced the valves and re-certified our two tanks. We're good to go for five year without worry, especially since the tanks are rust-free.

UPDATE 05 December 2017: Blue Ridge Energy in West Jefferson NC performed visual recertification on our two tanks for $5 each. The only small downside was, we had to be there at 0830 in the morning. Soooo early. But, we're good to go for another five years.


Return to top


E8. Two Sharp® 125 watt solar panels and a BZ® solar charge controller:


solar_panels charge_controller


We followed excellent recommendations and directions of Don Williams KD6UVT. We for two years managed the Airstream's two batteries almost exclusively from the solar panels without any use of the RV's insufficient Parallax converter/charger. We have had no shortage of battery power (see 6v batteries, next item) at any time and we were confident our batteries were enjoying a much more appropriate stream of charging current at all times (well, okay, the batteries aren't receiving any charge after sunset until sunrise).

We still had 110vac shore power to our air conditioner (which we use very infrequently except to test it periodically), microwave, and to the 110vac receptacles. We simply didn't use the Airstream's single-stage converter/charger to address the 12volt DC system. The 12 volt system was for almost two years expressly solar powered from the two solar panels through the charge controller to the batteries, because we were concerned the OEM single-stage charger was going to fry our batteries (see Intellipower 9260 smart converter/charger). We purchased our solar kit, The Pathmaker System, from Solartron Technologies Seven years later, the Pathmaker System sells for one-half what we paid with essentially the same components.

Jim installed the solar panels atop the Airstream's roof with z-brackets and wellnuts. This is a very secure mounting, is waterproof (the rubber wellnuts completely close the roof penetration for each anchor), and the z-brackets elevate the solar panels sufficiently to allow air cooling between the roof and the panels.

Give him a do-over, though, and Jim is ready to re-mount the two solar panels in a different way. Basic difference would be #14 pan head sheet metal screws instead of wellnuts. The wellnuts require a large diameter hole in the roof. The sheet metal screws require a small drilled hole into an indented surface, and they provide great holding strength.

UPDATE 12/12/2012: Jim mounted both panels onto a pair of 1.5"X1.5" aluminum thin-wall square tubing. Using the same tilt-mount hardware, he now can tilt both panels at once to face either curb-side or road-side. Much easier, much more effective than tilting only one panel at a time. Now both panels can face the sun at optimal angle. Takes five minutes, working from the ladder, to tilt the panels.


Return to top


E9. Interstate® 2200 6V batteries:

Interstate Batteries Our two 125 watt solar panels with MPPT charge controller were able to quickly charge the two 12v group 24 batteries. But the batteries didn't have the really deep discharge characteristics we want to make full use of the panels and our camper in dry-camping mode. We selected instead a pair of Interstate 2200 6 volt batteries. These are golf cart batteries with great discharge characteristics.

These 6v batteries each weigh approximately twenty pounds more than the OEM Interstate batteries and are still very manageable at 63 pounds each. Since the new batteries are each 6 volts we wired them in series with one of the short jumper cables from the OEM installation to make 12 volts. We removed the plastic box tray from under the batteries to allow the new ones to sit lower in the box. We added 1"X 2" wood at front and back of batteries to stabilize them in the center of the box. We extended the center clamp rod an inch with a 3/8" X 2" threaded coupling. We extended the battery box lid 1 3/4" higher with c-channel of .050" aluminum.

March 2012 Jim replaced the two 6v batteries and added two more for a total of four Interstate GC2-XHD-UT 6-VOLT batteries. See the article describing this project at this link.

He also installed battery watering systems for each bank of batteries. Our battery capacity is now 464 amp hours (per Interstate's rating), more than double the previous total (formerly with two older style Interstate U2200 batteries.) The improvement is wonderful, we can make several days usage on one day's charging. And we generally solely charge with solar power unless we have greater than three or four days without sunshine -- fairly uncommon for us. Or, if we're in a park under trees -- then the solar just doesn't come into play at all. Otherwise, we can live on solar powered electricity alone indefinitely.

UPDATE: January 2013 we spent January 5th through January 31st (except three days in a resort in Chula Vista CA) camping without access to shore power. We didn't use our little generator one time that month. It greatly helped that we had a lot of Arizona and southern California sunshine, of course.

UPDATE: January 2016 we removed two of the nearly four year-old 6v golf cart batteries, thus removing almost 175 pounds hitch weight. We found, during a recent coastal trip, the batteries would keep us going for days without sun but then would require many days, even in full sun, to fully recharge. Just seemed like too much battery for our two 125 watt solar panels. So we kicked two of the batteries back to Interstate for recycling and kept the best two. 230 amp hours seems like it should suit most of our boondocking needs and we still have a little-used 1000 watt portable generator.

UPDATE: January 2017 we bought a very good condition used 90 amp hour AGM battery from a friend and installed it in the cabin under the sofa. This adds over 1/3 more battery capacity. It'll take awhile to determine if this makes much difference.


Return to top


E10. Flag pole bracket and storage for three extending flag poles:


Flagpole bracket Flagpole storage

Flagpole socks


Flag poles were de rigeur in the Airstream owners association, WBCCI. We found the source for our flag poles and bracket in the club magazine, The Blue Beret, and have enjoyed frequent use of them. When not flying, the poles and flags require storage so we installed a flag storage tube under the trailer. Airstream Company installs a sewer hose storage tube under the trailer. We added a similar one, but longer, for the flagpoles. Deb sewed a sock for each flagpole. We collapse the poles' three sections down to shorten the poles for storage. We roll the flag on each pole and slide this into a sock. We store the three flags and poles under the trailer in the storage tube, out of the way, weather-proof, and secure.

February 2016 we found the storage tube dragging on the highway, hanging on under the trailer by one piece of pipe strap. Put the flags in the bed of the truck, put the storage tube in storage until we could do a good job remounting it. Used double thickness of pipe hanging strap and seems really secure. First install lasted many years, this one may go even further.


Return to top


E11. Equalizer® weight-distributing hitch

Many many posts have been written by many people about this easy-to-use trailer towing hitch setup. One year, camped with a bunch of Airstreamers for the Sun Valley Jazz Festival, ten Airstream trailers in a row all had the Equal-i-zer hitch and all claimed to love it. Do a search in Airforums or on your local internet browser for equal-i-zer and read about it. This hitch provides weight distribution and sway control. It may not do anything more, if even as much, as your favorite hitch. We've used it over one hundred thousand miles on this trailer and have used two others. The Equal-i-zer is the easiest of the three to use each time we hitch up or unhitch, and it has faultlessy managed our truck's and trailer's relationship more than ten years so far. We like it and would buy the same one again.

One tech tip: the most common complaint we hear from Equal-i-zer owners is the hitch squeaking and groaning while towing. Simple fix, per the manufacturer -- "lubricate the top and bottom of the spring arm sockets in the hitch head". You can see their helpful support information
at this link. It's so great when easy stuff fixes the annoying problems. Thanks Progressive Mfg!

We did our Tim Horton's Restaurant trans-Canada Tour in 2009 and suffered a broken Equalizer hanger on the trailer's a-frame. We caused this ourselves through our own faulty installation. Well, failure to re-install properly after changing the coupler, actually. We happened, in fact, to be parked in front of a Tim Horton's when we realized one of our WD bars was hanging down, no longer connected to the trailer.

Locally we found, 2 km down the road from Tim Horton's, an RV dealer with an Equalizer display model in their showroom. No, they didn't have Equalizer replacement hangers. Yes, they would happily provide us the one from their display model, at no charge. "Those Progressive/Equalizer folks are really good about this, they will make it good to us." We're on the road again, fully whole hitch-wise, in a half-hour. Read this story here


Return to top


E12. Sediment filter

We switched late in 2008 to a replaceable cartridge sediment filter for the Airstream's water hose. This is supposed to prevent, or reduce the incidence of, small stones and other debris lodging in the valves and water heater. We care even more about filtering water we are drinking or cooking. We filter our drinking water (including for hot tea) with a slim-line Brita pitcher on our counter top. It rides in the sink with the fruit basket when we are towing. We're very happy with the replaceable cartridge filter for the house and for the counter top.

One note, though. The sediment filter catches debris from the piped water before it gets to the trailer. It does nothing to stop debris we generate in our water heater. Our kitchen sink faucet stopped flowing September 2014. We took it apart completely to find a teaspoon or more hard white flakes or chips had clogged the faucet. We will increase how often we flush our water heater. Each time we flush it, these same white flakes pour out onto the ground. They apparently cook out from the water we are using (lots of Florida and Arizona water -- anyone's guess just where it starts.) A water treatment system would fix this. Want us to road test one for you?

UPDATE 5 December 2017: This Fall, on our way to Albuquerque for the Balloon Fiesta, we found an advert from Camping World for a discounted water softener. It's last year's model - we don't care, we don't know the difference from one year to another and won't miss the new year's upgrades. Several of our friends carry these for their trailers and deploy them for hard water. Two months in we've found we don't need it everywhere ad when we use it the water becomes silky soft. It came with a water hardness test kit to tell us when to deploy it.


Return to top


E13. Water Softener


picture of Water Softener
We noticed friends with water softeners at rallies or while courtesy parking with them. We'd never given a thought to purchasing and setting one up for ourselves. We've long had issues with calcite or lime crystals clogging our kitchen faucet. Repair involved disassembling the faucet body and removing the large flakes and small chunks of lime from the brass faucet body where the hot and cold feed lines attach to it. Also we'd observe lots of lime pieces running out of our water heater when we annually flushed it. Another aha! moment though - we get one of those every few years, you know? What if we could reduce the hardness in our water? Wouldn't this reduce the precipitation of lime in the water heater? A little checking with John G, an RV water treatment expert, supported our theory.

Conveniently, we found "last year's model" softener on line on sale. This is a "On The Go" standard model manual portable water softener. This fiberglas canister is 6 3/4" diameter and 22" tall. You recharge it using a 1# container of plain table salt through the large top opening. They say it's rated for up to 800 gallons. For us that's over 20 weeks of use. We've had it since October, or 24 weeks and we're still getting complete softening of our water, according to the nifty water test strips included with the purchase. It comes with adapters for easy backwash and convenient shutoff. It is fitted with hose connections for easy hookup.

What do we get for this additional 20# of stuff in our kit? Our water is, from our tap, slightly slippier until we add detergent or soap. Add soap and we can tell a big difference. We're six months in using this new thing. Our shower cleans up easier, dishes rinse better. Hookup is very easy, we simply connect the sediment filter then the softener to a water supply. The softener fits, standing up, in the bed of our truck under our tonneau cover. Unless we're expecting freezing weather we keep water in the softener. We'll update hear after we flush the water heater and share how the water softener is helping reduce liming in there.


Return to top


E14. Jack TV Antenna


picture of Jack TV antenna with install kit 
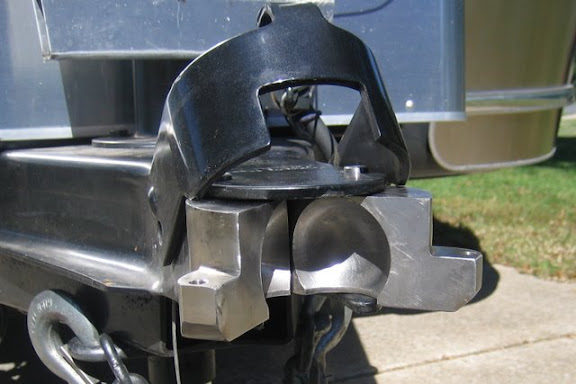
The Jack antenna is the first one to work on our 2005 Airstream trailer. This antenna really works. We were at AlumaFlamingo 2014 talking to another Airstreamer. He was bragging on how great his Jack antenna works. Amazing reception, he told us. We had never had a working television antenna on our trailer. A quick visit to Camping World put a Jack antenna retrofit kit in our hands. We installed it and WOW! We get tv stations like other people do -- finally!

Installation was a breeze. We disconnected the coax cable from the Winegard antenna. We pulled two pins holding the Winegard batwing antenna on the two square lifting tubes. We placed the Jack antenna in position and inserted two retaining pins. Plugged the coax cable into the new antenna. That's it. When we turn the crank handle from inside the trailer, the Jack antenna goes up and down, just as the Winegard batwing antenna formerly did. There's a big difference, though. We get great reception and a lot of stations. And we still hardly watch television. ACC mens basketball is starting up before long - we'll see if we can find games.


Return to top


E17. Ham Radios and roof-top antennae


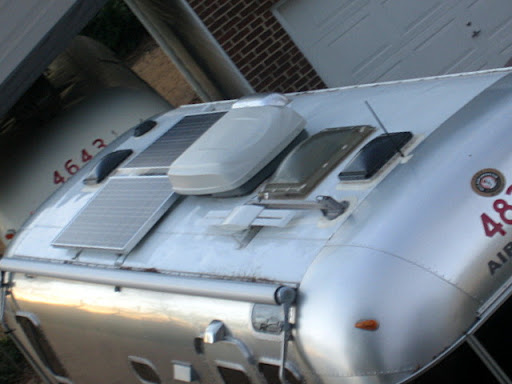
Tarheel® Lift and Lay roof-top antenna mount

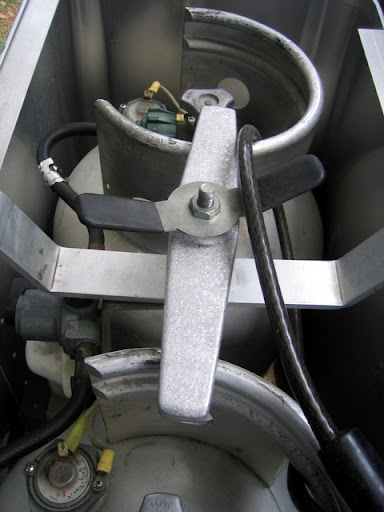
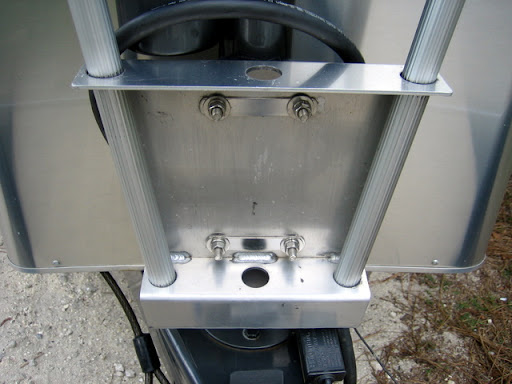
This is a fantastic product for roof-top screwdriver antennas. We have a twelve-feet vertical ham radio antenna on our Airstream's roof. It is too tall to travel the highways, and we don't want to climb up to the roof to mount/dismount it for every trip. Voila! An electrically powered tilting system for the antenna, completely controllable from within the trailer. Down, the antenna lays in a rooftop cradle over the front of the trailer. Up, we have an antenna with a whip reaching 21 feet above ground into the air. Looks Cool, Works Great!


High Sierra® HS1800Pro® HF Antenna

This High Sierra motorized antenna is a high quality setup for high frequency (10m to 80m) radio transmit and receive on amateur radio bands. It tunes well and works very nicely for us. It is mounted on the Tarheel Lift and Lay mount. We've used it in this configuration since November 2008 without problems, and have reached hams in 30 European countries and Hawaii with it. Lots more info about this and some of the following items on our ham radio page


Yaesu® 857d HF/UHF/VHF transceiver

This is the most compact of the mobile all-band transceiver amateur radios, and happens also to be the least cost for the quality. The more expensive products from Icom are probably a little easier to use and certainly the Icom displays are esier to read. This radio connects me just as well as the more expensive ones, and it sure fits in our rolling home very nicely.

An additional treat is receiving FM broadcast so we can listen to CBC or NPR over breakfast without getting up and tuning the Airstream's stereo. No biggie, but nice. Even better, we can pick up all ten of the NOAA weather band stations on this radio. This 857d has a very small footprint and works great for us. For more info on our ham radio equipment and uses, see our ham radio page


Kenwood® TM-D710a UHF/VHF transceiver

This APRS (automatic packet radio system, or automatic position reporting system) radio is in our truck. It is a great dual band vhf/uhf transceiver for mobile use, and it works much better for mobile use on these bands than the Yaesu 857. The Kenwood's APRS feature transmits our position data so you can look for us on the internet here. You'll see our last reported physical location with lat and long coordinates.

We added a Kenwood® TM-V71 transceiver in the trailer in 2010 to free the Yaesu 857 to HF uses only. The TM-V71 transceiver also monitors for NOAA weather alerts and, with its excellent roof-top 1/4 wave 2m antenna, avoids the problems we had with a small portable weather radio which had no external antenna.

Dec 2015 the Kenwood TM-D710a lost sensitivity on the "B" side. Despite it's age (eight years) we sent it to Kenwood's repair facility and they replaced the filters for free and shipped it back to us the same day they received it. We decided to move the smaller TM-V71 into the truck and put the TM-D710a in the trailer. Our location on GPS maps (using APRS - automatic packet reporting system) now may be updated when we move the trailer.


Return to top


E15. Yamaha® portable generator, more info than you thought you'd find?

Picture of Yamaha EF1000iS 
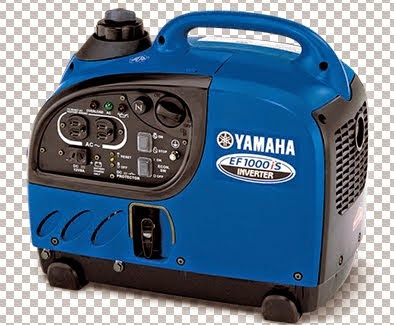
1kw 110vac gas-powered , 27 pounds of power. It's quiet, and a gas sipper. We wondered if we should haul one or two 2,000 watt generators. They, or a 3,000 watt unit would power everything we have. And we could use only one of the two 2,000s when we didn't need so much.

Folks, it's really simple -- if you can get by without having to run your roof air conditioner or your microwave, then you may not need any generator larger than a 1,000 watt (1 KW). A 1 KW generator is the lightest, smallest, and most economical to buy and operate. It will work for you IF your charge converter doesn't require over 1,000 watts. We found a good deal on a Yamaha EF1000iS. You can see good information on these at this web site.

The generator can handle the charge converter if nothing else is on AC power. We set our fridge on gas-only while connecting the trailer to the generator. Once the generator picks up the load we could turn the fridge back to automatic (although we don't -- we leave the fridge on propane when using the generator) as well as plug in the laptops or anything else we want.

We decided this is worth the little bit of care, for avoiding the weight and fuel consumption and cargo space of the larger generators. Why would we need to make our own power for air conditioning? Why would we want to heft a 50 pound generator when we could be swinging a 28 pound one instead? Our house has wheels so we can relocate if we need to. We bought the 1,000 watt (1 kw) generator in 2006 and would do the same again.

What about Honda vs Yamaha generators? Sure, they both make similar-sized units. They're both quiet and weigh the same. They both have great reputations. They displace the same amount of space in the truck. Two differences we've encountered in the first nine years of use: the Yamahas are blue instead of red, and there are fewer authorized or advertising Yamaha generator service centers than Honda ones. We didn't find a Yamaha service center the two times we took ours in for service. We took it to a lawn equipment place and asked if they could work on it. They did great and gave us good recommendations for maintaining it.

One other thing to consider, if your're shopping for a generator: be sure you're comparing Fuji apples to Fuji apples. The generator we, and almost all our RV friends, use is an inverter-type portable generator. This means it makes "clean" power like your trailer's electronics must have. The generator has this designation, "iS" in it's name. You can buy much less expensive stuff, and generators are no exception -- you get what you pay for. And you may pay dearly with damaged integrated circuit control boards (fridge, microwave, water heater, for example) if you use a low quality generator to feed your trailer.

The 1kw generator is small and lightweight, easy for us to handle. It's just the right size for re-charging our batteries if we need. Or we can maintain as many as four trailers on minimal 120vac, if they run their fridges and heat on gas. We store it in the truck's bed near the tailgate. We'll try to keep it there as much as we can. As a friend stated earlier this summer, we want to be generator snobs, eschewing noisy and smelly generator use for battery conservation and solar charging instead.

After more than eight years, we have found the generator a great relief sometimes and sometimes a convenience. We've repaired tires twice at roadside, using the generator to power the 110vac air compressor. We've loaned it to friends to recharge their trailer's batteries. And we've recharged our batteries a few times when dry-camping under heavy tree canopy or in less than ideal solar conditions. Since replacing the two golf-cart batteries with four (Mar 2012), we haven't needed the generator except in winter. Once, though, we did lend it to a motorhome friend to keep her powered up one week while we were all dry-camping in Sun Valley ID.

If you aren't reasonably careful to run your generator at least once monthly and either run only ethanol-free gas or keep StaBil® or SeaFoam® in the fuel, your generator might not respond when you crank on it. This happened to us a few years ago, cost us $60 to have the carburetor cleaned out from gummed fuel, the gas tank cleaned out, and the plug cleaned. Everything is hunky-dory again. We're running one-hour load tests monthly now and switched in 2014 to ethanol-free gas. Our generator really does start easier with the better gas. We still run it monthly for 3/4 to 1 hour under load.


Return to top


E16. Chevrolet Silverado 2500 HD and associated stuff:


Okay, not exactly a home improvement project, but our truck does improve our Airstream some, and suffers it's own improvements somewhat regularly. 4X4, 8.1L gas, Allison 1000 transmission, 3.73 diff, extended cab, short bed, 45 gallon tank (thanks to
Transfer Flow and Tom's 4 Wheel in Lexington NC for the tank change.) This is our Cowboy Cadillac, a great ride and capable tow vehicle. We are asked very frequently if we wouldn't rather a diesel engine. We consciously and carefully selected a gas-powered truck. The numbers just didn't add up, for us, for the diesel's higher first cost and fuel and maintenance. Twelve years and over 187,000 miles have, so far, proven us correct. We don't need more power, more noise, more smell, more maintenance. Loping along at 1,500 rpm (at 60 miles per hour towing in 6th gear) seems to promote long engine life, even for a gas engine.

Two unscheduled problems in the entire nine-year use: an oil cooler leak repaired under warranty; and a mass air flow sensor alarm. The latter just happened March 2012 and seems to have been caused by dirty MAF sensor. We bought a can of MAF sensor spray cleaner, used it, and cleared the problem. Don't over-oil your K&N air filter. No other problems. What a great truck! It has never stopped doing what we asked, never failed to start or, more importantly, to stop.


Our 100,000 mile service was even bigger than we expected and we thought we had big expectations. We spent $4,000 on our wonderful lifestyle hauler, the big red truck. A few suspension parts, four cooling lines (engine and transmission oil coolers), all the fluids, new plugs and wires (did you know how much more expensive these are than 45 years ago? like ten times more, at least!!!). Anyway, our truck is like new and we hope will go another five or six years at least. As some friends recently commented, the truck is paid for and this service cost is far less than cost of replacing our truck.

A nice surprise -- the mechanic said at 100,000 miles our brakes had plenty of life remaining. Remember how long brakes lasted when we were kids? The brakes had started pulsing pretty badly, indicating a likelihood of warped rotor. We finally replaced the front brakes pads and rotors at 140,000 miles. Everything's smooth again.

At 190,000 we ordered and installed a set of Bilstein 4600 shocks on the truck. They were super easy to install using my FIL's air wrench. Didn't need to jack up the truck to get to these but installation was eased by lifting a corner of the frame at a time while installing that shock - easier than trying to compress the new shocks. A friend had scoffed at our buying shocks for this truck saying, "No one needs to do this, shocks last forever." He might have been 75% correct on our truck - one of the four OEM shocks was completely worthless, the other three seemed okay. We replaced all four and are good to go another 190,000 miles.

At 200,000 we replaced the plugs, wires, mass air flow sensor, and shift lever on the steering column. The latter two were bad, the former two were by service dept recommendation. The maf had been throwing lean and Oxy sensor codes awhile. Dealer tested it and found circuit problems in the maf itself. Replaced 6,000 miles ago and zero codes since. Love my truck!


ARE® hard tonneau cover with exact color match to GM factory color

People often ask if we wouldn't rather have a camper shell instead of a tonneau cover. Considerations: (1) the tonneau cover allows full field of vision across the rear of the truck; (2) the tonneau cover raises well to allow access to things even at the front of the bed; (3) the tonneau cover looks darned sharp on our truck; (4) we don't want any more stuff than we can fit under the tonneau cover. The ARE tonneau cover has served really well, although the clear coat has started to peel in a few places. Disappointing and a little surprising.

UPDATE: Dec 2016 we contacted ARE about the clear coat on our tonneau cover. They initially declined to cover it under warranty, claiming we had waited too long before notifying them. We responded that their warranty doesn't provide any such limitations on timely notification, and we hadn't realized how badly it was going. We worked out a suitable settlement, they shipped it out and back and refinished it. The color doesn't match any more but it looks sharp and will hopefully last the life of the truck.

UPDATE: Mar 2017 we replaced both the gas struts for the tonneau cover. One had failed and it just wouldn't work with only one. Dec 2017 we replaced the balls studs for both struts lower connections. One had failed and we were pleased the replacement was straightforward and effective. See our brief article on replacing the gas strut's ball stud at our blog page here .


TST® tire pressure monitoring system, truck and trailer tires
Nothing is guaranteed, but we like to improve our chances when we can. If we receive notification of a low-pressure tire, we might stave off severe damage to that tire and then to the trailer too. A failed tire, at highway speeds, turns into a rotating flapping demon to wallow out your trailer's wheel wells and destroy whatever systems the flapping tread can reach.

So far, we've had low tire pressure alerts due to a loose sensor on the valve stem, and twice due to a tire puncture with slow leak. You might catch the pressure reductions through conscientious monitoring at rest stops and before every towing day. And you might not. Why take a chance, when a $400 system can watch all four tires continuously and might avert $2,000 or more damage to your trailer?

The TST® tire monitoring is very compact, battery-operated, and easy to use. We like the display of both pressure and temperature for each tire.


Garmin® NUVI® 650 GPS, "Lucy", who is correct over 50% of the time, provides us a view of streets so we can see turns ahead. Lucy is now five years old, does not do blue tooth or FM alerts, doesn't know speed limits. Doesn't seem to have much memory capacity. Battery is awful after five years, lasts only five minutes at most if not plugged into dc power. But she helps a lot most of the time and sometimes really goofs up.

And when she goofs, she can really goof us up. Fortunately we've learned the proper amount of skepticism for her recommended routes and we double check her trip plan before we commit. This is a pretty realistic relationship -- we don't expect too much and she rarely surprises.


Tailgate Assist

We installed a neat gizmo on our tailgate. Shopping at a 4Wheel Parts store we found the Dee Zee tailgate assistDZ43100 Tailgate Assist. (The product number will vary to correspond to your truck model and year) This allows us to unlatch the tailgate and let it drop freely -- it is nicely slowed by the gas shock. It doesn't help so much with lifting it, but is a nice aid in lowering it.


Coleman® air compressor, 2 gallon 110vac
This air compressor is noisy and doesn't pump truck or trailer tires quickly. No more often than we need it we are glad to give it the little space it requires. Just pull up a seat and plan to spend several minutes to add 15 pounds pressure to a tire.


Return to top


E18. Fridge Boiler Control by ARPRV


picture of Fridge Boiler Control Spring 2017 we read in Escapees Magazine about a product, the ARPrv, designed to improve the life and safety of our RV's absorption refrigerator. It's designed for Dometic or Norcold propane/electric refrigerators. We'd considered whether to add a cabinet automatic extinguisher as seen on Mac the Fire Guy's web pages and discussed in Air Forums. After finding this automatic boiler temperature control we don't feel any need to protect the fridge chase from fire. We hope th ARP will help protect our fridge from overheat conditions caused by operating while out of level.

Installation took Jim a couple of hours. The included directions were very clear and tech help was excellent. Jim contacted the inventors/sellers with a question on installation and they answered very promptly with helpful information. The installation looks neat and doesn't interfere with normal operation. Jim elected to install the control and display panel in the fridge outside compartment. We could have placed it inside the cabin instead and had one more cool info source here. Instead he can go outside, push a button, and marvel at reading whatever the boiler temperature is. Some people are easily amused. . . The big deal is this - most of us know someone who's lost their fridge's operation from boiler overheating. Our Norcold and Dometic fridges are designed for long lasting service. Many old Servel (Dometic) fridges have lasted 75 years and more. These are typically installed in buildngs, not RVs. Our RV fridges can be severely tested by unlevel conditions. This control watches for hazardous overheating and protects your fridge.

Return to top


E19. Miscellaneous Items


These miscellaneous items we associate with our full-timing experience but they just don't seem like enhancements to the camper. They are each one improvements to the tow vehicle or another aspect instead. These have each, so far, been far better than we could have expected. I mean, we did research them before purchasing but sometimes you just don't know if things will work out, you know? (e.g., see failures, below) We thought we might eventually describe these features in some fashion. Until then, they seemed to fit here better than any other place.


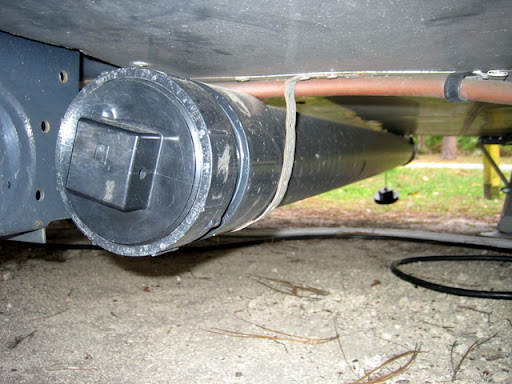
We now use a Blueline® system available, among other places, at Camping World. We have two ten foot sections with a slide-on coupler and a slide-on connection to the ell which threads into any of four different sizes of sewer dump connections. Not very expensive and worth every nickel. Camping World occasionally has a special deal for this BlueLine kit like we use so we replace hoses and fittings, throw away the four year-old set. Cheap insurance.


Air horns by Kleinn®
After friend Tom S showed us his nifty setup under his Toyota, we finally decided this was a highway safety feature we could implement. We added a two-trumpet Kleinn® system with a selector switch on the dash. We can select between city horns (the factory-installed Fiamme electric horns) and the country horn (the new air horns.) The Kleinn package included a very light duty compressor which didn't last long because of a leaking pressure switch on the air tank. We bought a 100% duty factor compressor and a new pressure switch. Good so far after three more years.


Trailer Mud Flaps by Jim
Two years after Steve R showed us his Airstream mud flaps, we stumbled upon an inexpensive big truck mudflap on our way to Albuquerque. Cut in two, mounted to a pair of 1" aluminum angle, and mounted at the back of each wheel well. Looks sharp and helps keep the back of the trailer clean.


Please email us if you're interested in source or experiences information on any of these "undescribed" features.

Return to top of this page

Go to Dreamstreamr Home Page

Go to What About The Failures?

E-mail Us at as4822@gmail.com

© dreamstreamr.com 2007-2019


::: Made with CoffeeCup : Web Design Software & Website Hosting :::